2015年1月30日 星期五

RIPv2

RIPv2和RIPv1不同的地方有
1.支援MD5認證
2.用多播代替廣播(224.0.0.9)
3.支援VLSM和不連續網路(Variable Length Subnet Mask可變動長度的子網路遮罩)
4.是屬於Classless
5.在更新封包中會有32bit的遮罩

RIPv2和RIPv1相同的地方有
1.使用距離向量協定
2.以Hop count作為metric
3.hop數大於15無法到達(也就是第16以上無法到達)
4.每30秒用廣播傳送更新訊息
5.AD為120
6.被封裝的UDP中、使用Port 520傳輸

RIPv2指令
在設定上與大部分與RIPv1相同只有在Router Rip一些差異
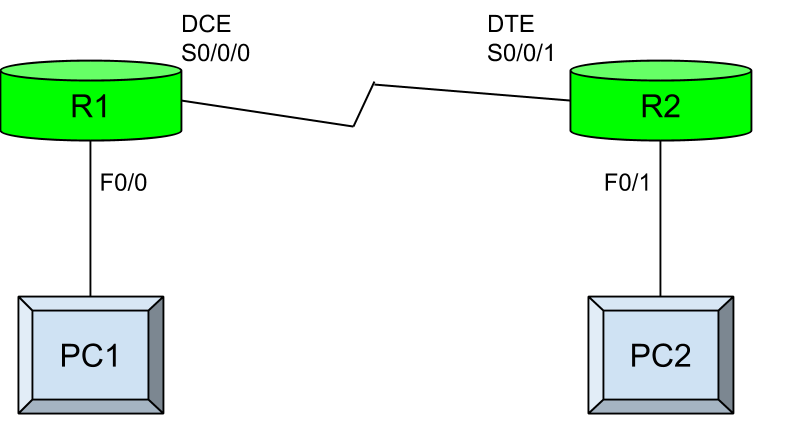
R1
R1>enable (從使用者介面進入特權模式)
R1#conf terminal (從特權模式進入全域組態設定模式)
R1(config)#interface fastEthernet 0/0(進入介面0/0設定模式)
R1(config-if)#ip address x.x.x.x x.x.x.x(IP位址 遮罩)
R1(config-if)#no shutdown(開啟此介面) 
R1(config-if)#exit(離開此模式)
R1(config)#interface serial 0/0/0(進入介面0/0/0設定模式)
R1(config-if)#ip address x.x.x.x x.x.x.x(IP位址 遮罩)
R1(config-if)#no shutdown(開啟此介面)  
R1(config-if)#clock rate 64000(設定時脈為64000因為是DCE端所以要設定時脈)
R1(config-if)#exit(離開此模式)
R1(config)#router rip(設定RIP路由)
R1(config-router)#version 2(選擇RIPv2)
R1(config-router)#network x.x.x.x (R1到PC1的網段)
R1(config-router)#network x.x.x.x (R1到R2的網段)
R1(config-router)#no auto-summary(設定非自動總結) 
R1(config-router)#exit(離開此模式)
R1(config)#^Z(回到特權模式)
R1#copy running-config startup-config(儲存設定) 

R2
R2>enable (從使用者介面進入特權模式)
R2#conf terminal (從特權模式進入全域組態設定模式)
R2(config)#interface fastEthernet 0/1(進入介面0/1設定模式)
R2(config-if)#ip address x.x.x.x x.x.x.x(IP位址 遮罩)
R2(config-if)#no shutdown(開啟此介面) 
R2(config-if)#exit(離開此模式)
R2(config)#interface serial 0/0/1(進入介面0/0/1設定模式)
R2(config-if)#ip address x.x.x.x x.x.x.x(IP位址 遮罩)
R2(config-if)#no shutdown(開啟此介面)  
R2(config-if)#exit(離開此模式)
R2(config)#router rip(設定RIP路由)  
R2(config-router)#version 2(選擇RIPv2)
R2(config-router)#network x.x.x.x (R1到PC1的網段)
R2(config-router)#network x.x.x.x (R1到R2的網段)
R2(config-router)#no auto-summary(設定非自動總結) 
R2(config-router)#exit(離開此模式)
R2(config)#^Z(回到特權模式)
R2#copy running-config startup-config(儲存設定)
========================================================================
認證MD5指令
R1
R1>enable (從使用者介面進入特權模式)
R1#conf terminal (從特權模式進入全域組態設定模式)
R1(config)#key chain aaa(定義認證名稱為aaa)
R1(config-keychain)#key 1(鍵號為1)
R1(config-keychain-key)#key-string 123456(認證字串為123456)
R1(config-keychain-key)#^Z(回到特權模式)
R1#conf terminal (從特權模式進入全域組態設定模式)
R1(config)#interface serial 0/0/0(進入介面0/0/0設定模式)
R1(config-if)#ip rip authentication key-chain aaa(啟動認證aaa)
R1(config-if)#ip rip authentication mode md5(使用MD5加密)

R2
R2>enable (從使用者介面進入特權模式)
R2#conf terminal (從特權模式進入全域組態設定模式)
R2(config)#key chain aaa(定義認證名稱為aaa)
R2(config-keychain)#key 1(鍵號為1)
R2(config-keychain-key)#key-string 123456(認證字串為123456)
R2(config-keychain-key)#^Z(回到特權模式)
R2#conf terminal (從特權模式進入全域組態設定模式)
R2(config)#interface serial 0/0/1(進入介面0/0/1設定模式)
R2(config-if)#ip rip authentication key-chain aaa(啟動認證aaa)
R2(config-if)#ip rip authentication mode md5(使用MD5加密)
========================================================================

其他

2015年1月23日 星期五

RIPv1(Routing information Protocol)

RIP是使用距離向量協定,也就是經過的路由器數量來做為距離單位。使用RIP協定後,其閘道器會分為兩類就是主動和被動(主動就是發送廣播封包、被動只能接收封包),在相同的時間點只可以有一個主動、其餘的皆為被動,主要為了防止廣播風暴。

RIP特性
1.使用距離向量協定
2.以Hop count作為metric
3.hop數大於15無法到達(也就是第16以上無法到達)
4.每30秒用廣播傳送更新訊息
5.屬於有分類網路(FLSM  Fixed Length Subnet Mask 固定長度子網路遮罩)
6.AD為120


RIP指令
R1
R1>enable (從使用者介面進入特權模式)
R1#conf terminal (從特權模式進入全域組態設定模式)
R1(config)#interface fastEthernet 0/0(進入介面0/0設定模式)
R1(config-if)#ip address x.x.x.x x.x.x.x(IP位址 遮罩)
R1(config-if)#no shutdown(開啟此介面) 
R1(config-if)#exit(離開此模式)
R1(config)#interface serial 0/0/0(進入介面0/0/0設定模式)
R1(config-if)#ip address x.x.x.x x.x.x.x(IP位址 遮罩)
R1(config-if)#no shutdown(開啟此介面)  
R1(config-if)#clock rate 64000(設定時脈為64000因為是DCE端所以要設定時脈)
R1(config-if)#exit(離開此模式)
R1(config)#router rip(設定RIP路由) 
R1(config-router)#network x.x.x.x (R1到PC1的網段)
R1(config-router)#network x.x.x.x (R1到R2的網段)
R1(config-router)#exit(離開此模式)
R1(config)#^Z(回到特權模式)
R1#copy running-config startup-config(儲存設定) 

R2
R2>enable (從使用者介面進入特權模式)
R2#conf terminal (從特權模式進入全域組態設定模式)
R2(config)#interface fastEthernet 0/1(進入介面0/1設定模式)
R2(config-if)#ip address x.x.x.x x.x.x.x(IP位址 遮罩)
R2(config-if)#no shutdown(開啟此介面) 
R2(config-if)#exit(離開此模式)
R2(config)#interface serial 0/0/1(進入介面0/0/1設定模式)
R2(config-if)#ip address x.x.x.x x.x.x.x(IP位址 遮罩)
R2(config-if)#no shutdown(開啟此介面)  
R2(config-if)#exit(離開此模式)
R2(config)#router rip(設定RIP路由)  
R2(config-router)#network x.x.x.x (R1到PC1的網段)
R2(config-router)#network x.x.x.x (R1到R2的網段)
R2(config-router)#exit(離開此模式)
R2(config)#^Z(回到特權模式)
R2#copy running-config startup-config(儲存設定) 
========================================================================
其他指令
R1#show ip route(顯示目前有哪些路由協定)
R1#show running-config(顯示目前有設定那些組態)
R1#show ip protocols(顯示路由器繞送相關資訊)
R1#debug ip rip(動態除錯)
R1#undebug all(關閉除錯)
R1(config)#ip route x.x.x.x x.x.x.x x.x.x.x(網段  網段遮罩  下一個跳點)
R1(config-router)#timers basic 30 180 180 240(更改計時器時間  Updates、Invalid、Hold down、Flush)
R1(config-router)#distance 120(更改AD)
R1(config-router)#passive-interface FastEthernet 0/0(關閉F0/0的更新廣播)
R1(config-router)#default-information originate(傳送預設路由)
========================================================================
RIP使用了四種計時器
1.Updata timer:預設為30秒,每隔30秒就會傳出更新路由的封包
2.Invalid timer:預設為180秒,當180秒後未收到更新封包時就會,將路徑判定為無效
3.Hold-down timer:預設為180秒。當Invalid timer逾時後進入保留狀態。
4.Flush timer:預設為240秒。當240秒後將會清除此路徑。


RIP缺點:收斂較慢、繞送迴圈、週期更新有機率發生碰撞
改善方法有下列六種
1.Maximum metric
2.Trigged update
3.Hold down
4.Split horizon 
5.Poison reverse
6.RIP_JITTER


1.Maximum metric
繞送迴圈的解決方法之一就是Maximum metric機制,繞送迴圈就是一直計數到無限永不停止,因此只要設置一個最大值在這裡是設置為15超過15也就是16(含16)以上就會被判為無法到達(unreachable)的路徑。

2.Trigged update(觸發更新)
當拓樸或者路由表改變時,立刻傳出路由表更新。但無法解決迴圈問題
觸發條件如下:
1.介面狀態改變時
2.路徑無法到達時
3.剛開啟路由協定時

3.Hold down計數器
用於介面不穩定時比如接觸不良或發生flapping使介面會來回在up與down之間來回跳動,因為有Trigged update所以路由器將會一直傳送更新路由表反而無法達捯收斂,所以使用Hold down計數器可以解決此問題。

解決方法就是當路徑由可以到達變為無法到達時,此路徑就會被標上Possibly Down,且直接進入holddow狀態,開始計時,在這期間路徑會被保留,若收到路徑更新資訊,較好時將會更新且跳出holddow狀態,較差或相同時則會忽略,假設在這段期間有封包傳送則路由器依然會根據Possibly Down來傳送封包。

4.Split horizon (水平分割)
不會將訊息傳回原介面
當200.1.3.0網路消失時R1不會將200.1.3.0這個網路回傳,因此避免了迴圈。

5.Poison reverse(逆向毒害)
這種方法就是將Hop數直接設為16(無法到達)再配合觸發更新將封包傳到其他台路由器上。
6.RIP_JITTER
碰撞的問題思科使用了RIP_JITTER的隨機變數來解決,它會以0%~15%的更新時間做變化,讓每一台路由器不會同時更新以減少碰撞


2015年1月21日 星期三

RIPv2+EIGRP


練習檔案下載:https://drive.google.com/file/d/0B-z-UZB41PNbVTlFRFRtd2ZlZFU/view?usp=sharing


介面設定:
1. Cisco 1841 RA路由器
FastEthernet 0/0 介面之 IP為 NetRA最後一個可使用IP
Serial 0/0/0 介面之 IP為 NetA-B第一個可使用IP

RA>enable
RA#conf terminal
RA(config)#interface fastEthernet 0/0
RA(config-if)#ip address 10.1.0.62 255.255.255.192
RA(config-if)#no shutdown
RA(config-if)#exit
RA(config)#interface serial 0/0/0
RA(config-if)#ip address 192.168.1.1 255.255.255.252
RA(config-if)#no shutdown
RA(config-if)#exit

2. Cisco 1841 RB路由器
FastEthernet 0/0 介面之 IP為 NetRB最後一個可使用IP
Serial 0/0/0 介面之 IP為 NetA-B最後一個可使用IP,提供兩部路由器之間的電路為64000bps
Serial 0/0/1 介面之 IP為 NetB-C第一個可使用IP,提供兩部路由器之間的電路為2Mbps

RB>enable
RB#conf terminal
RB(config)#interface fastEthernet 0/0
RB(config-if)#ip address 10.1.0.94 255.255.255.224
RB(config-if)#no shutdown
RB(config-if)#exit
RB(config)#interface serial 0/0/0
RB(config-if)#ip address 192.168.1.2 255.255.255.252
RB(config-if)#clock rate 64000
RB(config-if)#no shutdown
RB(config-if)#exit
RB(config)#interface serial 0/0/1
RB(config-if)#ip address 192.168.1.5 255.255.255.252
RB(config-if)#clock rate 2000000
RB(config-if)#no shutdown
RB(config-if)#exit

3. Cisco 1841 RC路由器
FastEthernet 0/0 介面之 IP為 NetRC最後一個可使用IP
Serial 0/0/1 介面之 IP為 NetB-C最後一個可使用IP
Serial 0/0/0 介面之 IP為 NetC-D第一個可使用IP,提供兩部路由器之間的電路為2Mbps

RC>enable
RC#conf terminal
RC(config)#interface fastEthernet 0/0
RC(config-if)#ip address 10.10.2.46 255.255.255.240
RC(config-if)#no shutdown
RC(config-if)#exit
RC(config)#interface serial 0/0/1
RC(config-if)#ip address 192.168.1.6 255.255.255.252
RC(config-if)#no shutdown
RC(config-if)#exit
RC(config)#interface serial 0/0/0
RC(config-if)#ip address 192.168.1.9 255.255.255.252
RC(config-if)#clock rate 2000000
RC(config-if)#no shutdown
RC(config-if)#exit

4. Cisco 1841 RD路由器
FastEthernet 0/0 介面之 IP為 NetRD最後一個可使用IP
Serial 0/0/0 介面之 IP為 NetC-D最後一個可使用IP

RD>enable
RD#conf terminal
RD(config)#interface fastEthernet 0/0
RD(config-if)#ip address 10.10.2.30 255.255.255.224
RD(config-if)#no shutdown
RD(config-if)#exit
RD(config)#interface serial 0/0/0
RD(config-if)#ip address 192.168.1.10 255.255.255.252
RD(config-if)#no shutdown
RD(config-if)#exit

5. 個人電腦
PC-PT A之IP為NetRA第一個可使用IP

IP address            10.1.0.1
Subnet Mask         255.255.255.192
Default Gateway   10.1.0.62

PC-PT B之IP為NetRB第一個可使用IP

IP address            10.1.0.65
Subnet Mask         255.255.255.224
Default Gateway   10.1.0.94

PC-PT C之IP為NetRC第一個可使用IP

IP address            10.10.2.33
Subnet Mask         255.255.255.240
Default Gateway   10.10.2.46

PC-PT D之IP為NetRD第一個可使用IP

IP address            10.10.2.1
Subnet Mask         255.255.255.224
Default Gateway   10.10.2.30

路由設定:
NetRA與NetRB間使用EIGRP且自治系統號碼設定為101,NetRC與NetRD間使用RIPv2。RB與RC使用預設路由。將沒有必要參與EIGRP或RIPv2更新的介面停止更新運作。

RA
RA(config)#router eigrp 101
RA(config-router)#network 10.1.0.0 0.0.0.63
RA(config-router)#network 192.168.1.0 0.0.0.3
RA(config-router)#passive-interface f0/0
RA(config-router)#no auto-summary
RA(config-router)#exit
RA(config)#^Z
RA#copy running-config startup-config

RB
RB(config)#router eigrp 101
RB(config-router)#network 192.168.1.0 0.0.0.3
RB(config-router)#network 10.1.0.64 0.0.0.31
RB(config-router)#passive-interface f0/0
RB(config-router)#passive-interface s0/0/1
RB(config-router)#redistribute static
RB(config-router)#no auto-summary
RB(config-router)#exit
RB(config)#ip route 0.0.0.0 0.0.0.0 192.168.1.6
RB(config)#exit
RB#copy running-config startup-config

RC
RC(config)#router rip
RC(config-router)#version 2
RC(config-router)#network 192.168.1.8
RC(config-router)#network 10.10.2.32
RC(config-router)#passive-interface s0/0/1
RC(config-router)#passive-interface f0/0
RC(config-router)#no auto-summary
RC(config-router)#default-information originate
RC(config-router)#exit
RC(config)#ip route 0.0.0.0 0.0.0.0 192.168.1.5
RC(config)#exit
RC#copy running-config startup-config

RD
RD(config)#router rip
RD(config-router)#version 2
RD(config-router)#network 192.168.1.8
RD(config-router)#network 10.10.2.0
RD(config-router)#passive-interface f0/0
RD(config-router)#no auto-summary
RD(config-router)#exit
RD(config)#exit
RD#copy running-config startup-config

於個人電腦PC-PT A上使用ping測試與PC-PT B、PC-PT C、PC-PT D是否連通。

ping 10.1.0.65
ping 10.10.2.33
ping 10.10.2.1


2015年1月20日 星期二

路由器RIPv2動態路由設定2


練習檔案下載:https://drive.google.com/file/d/0B-z-UZB41PNbMmdZdXBQdmV5V3M/view?usp=sharing


第一部分: 建立網路環境:
1. 在Tiit-Router擴充槽上安裝一片WIC-2T模組產生Serial 0/3/0 介面及Serial 0/3/1 介面。
2. 將Nanya-Router的 Serial 0/0/0 介面連接 ISP 路由器的 Serial 0/0/0 介面及Serial 0/0/1 介面連接 Tiit-Router的 Serial 0/3/0 介面,其中Nanya-Router的Serial 0/0/0及Serial 0/0/1都為DTE端。
3. Nanya-Router路由器之 FastEthernet 0/0 介面連接Nanya-Switch 交換器之 FastEthernet 0/1 介面,路由器之 FastEthernet 0/1 介面連接WirelessTiit無線AP 之 Internet 介面。

4. Nanya-Switch 交換器使用FastEthernet 0/2 連接 PC-PT D。


第二部分: 網路組態設定:
1 在Tiit-Router路由器:
1.1 路由器名稱設定為Tiit-Router

Router>enable 
Router#conf terminal 
Router(config)#hostname Tiit-Router

1.2 加密之特權模式密碼為 ccna

Tiit-Router(config)#enable secret ccna
Tiit-Router(config)#exit

1.3 主控台使用者模式之密碼為 cisco

Tiit-Router#conf terminal 
Tiit-Router(config)#line console 0
Tiit-Router(config-line)#password cisco
Tiit-Router(config-line)#login
Tiit-Router(config-line)#exit

1.4 虛擬終端機使用者模式之密碼為 tiitcsie

Tiit-Router(config)#line vty 0 5
Tiit-Router(config-line)#password tiitcsie
Tiit-Router(config-line)#login
Tiit-Router(config-line)#exit

1.5 FastEthernet 0/0 介面之IP為與IP 172.16.200.200/22相同網路的最後一個可使用IP

Tiit-Router(config)#interface fastEthernet 0/0
Tiit-Router(config-if)#ip address 172.16.203.254 255.255.252.0
Tiit-Router(config-if)#no shutdown 
Tiit-Router(config-if)#exit

1.6 FastEthernet 0/1 介面之 IP請查看 PC-PT B之IP相關設定資訊進行設定

Tiit-Router(config)#interface fastEthernet 0/1
Tiit-Router(config-if)#ip address 192.168.200.139 255.255.255.192
Tiit-Router(config-if)#no shutdown 
Tiit-Router(config-if)#exit

1.7 Serial 0/3/0介面之IP為192.168.200.5/30,提供兩部路由器之間的電路為64000bps

Tiit-Router(config)#interface serial 0/3/0
Tiit-Router(config-if)#ip address 192.168.200.5 255.255.255.252
Tiit-Router(config-if)#clock rate 64000
Tiit-Router(config-if)#no shutdown
Tiit-Router(config-if)#exit 

1.8 設定使用動態路由RIP路由協定

Tiit-Router(config)#router rip 
Tiit-Router(config-router)#version 2
Tiit-Router(config-router)#network 172.16.200.0 
Tiit-Router(config-router)#network 192.168.200.128
Tiit-Router(config-router)#network 192.168.200.4
Tiit-Router(config-router)#no auto-summary 
Tiit-Router(config-router)#exit

1.9 路由器所有密碼均設定加密保護

Tiit-Router(config)#service password-encryption 
Tiit-Router(config)#exit
Tiit-Router#copy running-config startup-config 

2 在Nanya-Router路由器:
2.1 路由器名稱設定為Nanya-Router

Router>enable 
Router#conf terminal 
Router(config)#hostname Nanya-Router

2.2 FastEthernet 0/0 介面之IP請查看 PC-PT D之IP相關設定資訊進行設定

Nanya-Router(config)#interface fastEthernet 0/0
Nanya-Router(config-if)#ip address 192.168.50.100 255.255.255.128
Nanya-Router(config-if)#no shutdown 
Nanya-Router(config-if)#exit

2.3 FastEthernet 0/1 介面之 IP 為192.168.50.254/25

Nanya-Router(config)#interface fastEthernet 0/1
Nanya-Router(config-if)#ip address 192.168.50.254 255.255.255.128
Nanya-Router(config-if)#no shutdown 
Nanya-Router(config-if)#exit

2.4 Serial 0/0/0介面之IP為172.16.1.2/30

Nanya-Router(config)#interface serial 0/0/0
Nanya-Router(config-if)#ip address 172.16.1.2 255.255.255.252
Nanya-Router(config-if)#no shutdown 
Nanya-Router(config-if)#exit

2.5 Serial 0/0/1介面之IP為192.168.200.6/30

Nanya-Router(config)#interface serial 0/0/1
Nanya-Router(config-if)#ip address 192.168.200.6 255.255.255.252
Nanya-Router(config-if)#no shutdown 
Nanya-Router(config-if)#exit

2.6 設定使用動態路由RIP路由協定

Nanya-Router(config)#router rip 
Nanya-Router(config-router)#version 2
Nanya-Router(config-router)#network 192.168.200.4
Nanya-Router(config-router)#network 172.16.1.0
Nanya-Router(config-router)#network 192.168.50.128
Nanya-Router(config-router)#network 192.168.50.0
Nanya-Router(config-router)#no auto-summary 
Nanya-Router(config-router)#exit
Nanya-Router(config)#exit
Nanya-Router#copy running-config startup-config 

3 Linksys WRT-300N WirelessTiit無線網路AP:

3.1 對外之網路介面使用固定IP,IP位址為 192.168.50.129/25
3.2 對內使用預設的私有IP位址,並啟用DHCP服務
3.3 更改AP的SSID為 Tiit-AP,讓其下的 Laptop-PT NB可以連接上網


4 個人電腦PC-PT A:
4.1 IP位址設定為 172.16.200.200/22

IP address            172.16.200.200
Subnet Mask         255.255.252.0
Default Gateway   172.16.203.254

5 個人電腦PC-PT C:
5.1 IP位址設定為 PC-PT B所屬網路第一個可使用IP

IP address            192.168.200.129
Subnet Mask         255.255.255.192
Default Gateway   192.168.200.139

6 筆記型電腦Laptop-PT NB:
6.1 裝上無線網卡,並且透過無線網卡連接Tiit-AP無線網路AP


2015年1月18日 星期日

Distance Vector Routing Protocols(距離向量路由定)

特性:
1.Periodic Updates(週期更新):每隔一段時間就會送出路由表。
2.Neighbors(鄰居關係):使用相同的路由協定,並分享鏈路的路由器。
3.Broadcast Updates(廣播更新):所有Neighbors的路由器都會收到廣播並進行處理。有些會使用multicast來取代broadcast。

優點:
1.容易維護和學習
2.資源消耗低,但規模大的網路頻寬會消耗較高

缺點:
1.收斂較慢
2.會產生迴圈
3.擴充性受限制

收斂流程


2015年1月17日 星期六

動態路由協定

動態路由的好處就是當拓樸改變時不用手動設定它會自動學習並更改並且選擇最佳路徑,但是所需付出的代價就是需要使用較多的資源(CPU、記憶體、頻寬)。


動態與靜態比較列表

Metric(指標):每個路由協定的衡量方式都不一樣,其中常見的指標包含
                     1.Hop count(跳躍數):封包要到達目的所需經過的路由器數量
                     2.Bandwidth(頻寬):鏈路最大的資料流通量。
                     3.Delay(延遲):封包經過路徑所需的時間
                     4.Load(負載):目前鏈路的使用率
                     5.Cost(成本):由IOS或使用者自行設定路徑的數值
                     6.Reliability(可靠性):根據以往錯誤發生的記錄,選出一條失敗率最低機率的路徑


Administrative Distance(管理性距離):在路由器中是可以設定兩種以上的路由協定,但是兩種的指標都不一樣,無法拿來比較,這時就需要AD(Administrative Distance)。在AD的範圍0~255中數值越小越好,255則是不會使用路由協定,當然數值是可以自由變更的。
接下來介紹Classful Routing Protocols(有分類路由協定)和Classless Routing Protocols(無分類路由協定)

Classful Routing Protocols:在傳送訊息時,並不回送出遮罩的訊息,而是靠A、B、C類來決定遮罩。

Classless Routing Protocols:可以使用不連續的網路,也就是會傳遞遮罩的訊息。


Distance Vector Routing Protocols(距離向量路由協定)簡寫為DV
LinkStats Routing Protocols(鏈路狀態路由協定)簡寫為LS

Autonomous System(自治系統)簡稱AS    

IGP(Interior Gateway Protocols):用於自治系統內
EGP(Exterior Gateway Protocols):用於自治系統之間